Managing Your Ankles: From Injury to Full Function (Part 2)
This is Part 2 in a 3-part series: View Part 1 | View Part 3
By Nick Mong, PT, DPT, ATC.
While the advice below comes from a physical therapist and athletic trainer with nearly a decade of experience, no article can replace a thorough and individual examination by a qualified professional. If you have sustained a sports injury which is failing to heal in a timely manner, or you have tried to return to your sport and suffered the same injury, you should seek the help of your physical therapist or orthopedic physician for evaluation and guidance.
There are several important facets of the ankle to get working correctly during the rehabilitation process. As long as your swelling is under control, the amount of pain should be minimal to non-existent when your ankle at rest. However that doesn’t mean there won’t be some pain when get it moving.
This type of pain is known as mechanical pain, which simply means that something (or several things) in your ankle aren’t working well together and create pain when they get in each other’s way. I sometimes tell my patients to picture their finger placed in a doorjamb and slowly closing the door; you’ll quickly go from a state of no pain to quite painful with just a little bit of pressure, but it’s also easy to quickly resolve the pain by opening the door again.
With ligament sprains this mechanical pain comes from the joints in your ankle being stiff and pinching together when they reach the end of their restricted range of motion. In the case of a muscle strain, it commonly comes from the injured muscle being weakened and not being able to contract as strongly as it should to hold its own during active movement.
For my money, regaining full and pain-free range of motion is the most important part of the rehab process. Without a joint that moves as cleanly and fluidly as its counterpart on your other leg, it’s easy to subtly change your gait pattern and end up with compensation problems higher up in your body sooner or later.
There are 4 major ways your ankle can move: Up, down, in and out (or dorsiflexion, plantarflexion, inversion and eversion if you prefer the technical terms). After a joint sprain to the outside of the ankle (which account for 9 of 10 ankle sprains), the most painful motion will typically be the inwards movement since it recreates the original mechanism of injury. At first, even slight inward movements will hurt because you’re tugging on tissue that’s trying as hard as it can to heal up. As time passes it will take more and more force to recreate that painful response, until finally you’ll be able to pull as hard as you can and you’ll just experience a firm stretch. At that point, you can probably consider the torn ligament healed. However, there’s a much more important range of motion to restore which is the dorsiflexion, or upwards movement.
Dorsiflexion is the motion that typically takes the longest to fully return after any ankle sprain, and it’s due to that pesky swelling that I mentioned earlier. When swelling is present in the ankle, there are only a few places it can settle and it almost always sets up shop in the front part of the joint. The various chemicals and extra fluid present causes the front part of the joint to get tight and restricted, which in turn limits how well it can dorsiflex. This is what causes the limp that most people demonstrate after a sprain.
A limp doesn’t happen because the ligaments are still getting stressed when you’re walking, it occurs because the ankle is not able to fully bend forward while taking a step and you shorten up your stride on that leg to avoid the “pinch”. The sooner you can get that motion back, the more normal your walking and running will feel and the less likely you’ll be to develop a compensation problem.
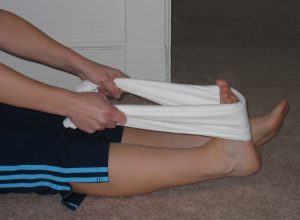 A great beginning stretch for this type of restriction is to simply take a belt or large towel in your hands, hook it onto the front of your foot, and pull your toes towards your nose until you feel a good stretch or tension in the front of your ankle (and probably some in the back of you calf). A more intense self stretch can be done by placing your foot on the floor just in front of a wall, and slowly bending your knee so that it gradually moves over your ankle and toes towards the wall, without lifting your heel up from the floor. Hold either of these stretches for 10-15 seconds, relax for 3-5, and repeat 10 times a few times per day. If you try the same stretch at the wall with your non-injured leg, you can measure your progress with your mobility; if you can just barely touch the wall with your knee and your heel stays down, measure the distance from your big toe to the wall. Once that distance is the same on both sides, you’ll have your full mobility back.
When it comes to getting your strength back, the most important muscle to focus on is the calf. It provides the last big push off the ground for your body when running, and is the first muscle to slow your body down when landing from a jump. It can also be a common muscle to strain when returning to full activity, so make sure it’s as strong as possible by working on calf raises.
Initially, start with rising up onto your toes on both feet, shift 90% of your weight onto your injured ankle, try to hold that position for 5 seconds, and repeat it 10 times. Once that becomes easy, repeat the exercise but slowly lower your entire body weight by just using your injured leg after you’ve held for 5 seconds, then push back up using both legs. The final progression is simply pushing up into a calf raise with just your injured ankle slowly and with control, to its full height, at least 20 times. If your work on progressing these exercises over a few days, your calf will be quickly ready to go.
Regaining strength can be a little more complex for the side and top muscles, but one great functional activity to work on is single leg balance. The muscles on the side of your ankle primarily work to stabilize it during foot contact while walking and running, so trying to balance on one leg for a prolonged period of time can get those muscles quite a good amount of work. Once you’re able to balance on your injured ankle for about 30 seconds without much wobbling back and forth, making it more challenging can be as easy as playing catch with yourself with a tennis ball or slowly turning your head side to side.
More advanced balance activities will be covered in the last segment of this series, which will focus on prevention of re-injury.